Saturday, October 9, 2010

Popcorn Box Mailer


For all those things to be sent snail mail when you need a good solid envelope.

Supplies:
popcorn carton
Tools:
scissors
ruler
utility knife
hot glue gun and glue sticks

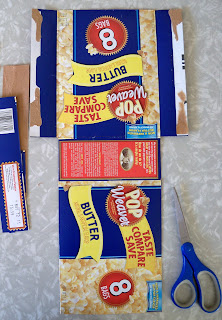
1) Open up popcorn box along and glued down seams.

2) Cut off all flaps, except one on each side of one larger side (see pic.).
3) Fold over onto itself, using one of the pre-existing seams. Score along where the top edge of the shorter side lays on top of the longer side. Score an additional line 1/4" above that score line.
Trim corners of flap on a diagonal.
4)Fold over the top, scored flap onto shorter side. Mark the lower flap approximately 1/4" below the end of the top flap. Using the utility knife, carefully cut a line between the two marked points.
5) Using the hot glue gun, carefully glue down the bottom sides of the envelope.
6) Slide top flap into cut line.
Tip: Use large plain address labels to have a white surface to write on when mailing.
craft skill level: 2 out of 5

Friday, October 8, 2010

Juice Carton Wallet


Here's one to leave your money smelling like oranges; rather than stinky cow hide.

Supplies:
orange juice carton
adhesive velcro

Tools:
hot glue gun and glue sticks
scissors
ruler/yard stick
paper scorer

1) Rinse and dry an empty juice carton. Open the carton carefully along glued down seams.
2) Cut and discard top and bottom flaps and two small side flaps.

3) Rescore carton's previous fold lines and score a new line vertically down the center.

4) Cut and discard negative areas (see picture for example).

5) Fold over along vertical seam and over along horizontal seams.

6) Using the hot glue gun, carefully glue down only the outside edges of the two end flaps.
Glue down only the right end of large center money flap.

7) Using adhesive velcro, attach a piece to each folded in end flap, and close together to secure.

Tip:Add money, ID and CCs and you're good to go. Reinforce scored and folded edges with clear packaging tape.
craft skill level: 3 out of 5

Thursday, June 10, 2010

Juice Carton Photo and Card Display


Supplies:
recyclable orange juice carton
decorative paper
cards
photos

Tools:
scissors
ruler
hot glue gun and glue sticks

1) Cut off top of juice carton and discard.

2) Measure up about 3 inches from the bottom and mark around perimeter of carton.

3) Cut approximately 1/2" vertical strips all around carton, making sure not to cut past 3" marked line.

4) Using the hot glue gun, carefully roll over each strip and glue securely to the bottom of the carton.

5) Using decorative paper, cut four pieces to fit at corners of carton and glue in place.

6) Fill the center with ribbon, flowers, or whatever and slide photos and cards into the slits around the carton.

Tip: Make an awesome centerpiece using flowers and black and white photos.
craft skill level: 3 out of 5

Wednesday, June 9, 2010

Cereal Box Check Book Cover


Supplies:
recyclable cereal box
check book and check register

Tools:
scissors
yard stick or ruler
paper scorer
x-zacto knife
hot glue gun and glue sticks

1) Flatten cereal box by opening up along glued down seams.

2) Cut off front face side and discard rest or save for another project.

3) Measure a mark a 10 1/2" by 6 3/4" rectangle. Cut excess and discard.

4) Measure and mark at 2" in on both ends of 10 1/2" side. Measure and mark at halfway of 10 1/2".

5) Draw a small rectangle for a tab and using x-zacto knife, very carefully cut along three sides. Using the ruler, line up other end and again carefully using x-zacto knife cut a corresponding slit.

6) Using scorer score along the 2" marked lines and halfway point. Fold in at the three lines.

7) Using the hot glue gun, carefully glue in both 2" flaps only at the very outside edges, not along the length (you need to leave that part unglued in order to slide in check book and register).

8) Put in check book and close using tab closure.

Tip:Use the box inside out to make a simpler looking check book cover. Try different closure ideas (snap, adhesive velcro).
craft skill level: 3 out of 5

French Toast Box Magazine Organizer


Supplies:
recyclable french toast box
magazines

Tools:
hot glue gun and glue sticks

1) Flatten french toast box by opening up along glued down seams.

2) Using a hot glue gun, carefully glue box back together inside out. Glue bottom flaps, and then both side flaps.

3) Glue top flaps into the inside of the box.

4) Put magazines inside.

Tip: Take multiple boxes to make multiple magazine organizers. Tie multiple boxes around perimeter with a ribbon to hold them all together.

craft skill level: 1 out of 5

Thursday, May 27, 2010

Soup Can Wedding Car Decoration


Supplies:
recyclable cans
ribbon

Tools:
drill and drill bit
can opener
optional goo-gone

1) Remove labels from cans, use goo-gone to remove adhesive residue. Use can opener to remove bottom lid.

2) Carefully use drill and bit to drill two holes at the top of each can, one on each side.

3) Using the ribbon, weave through the holes in the cans, leaving about 5 inches of ribbon between each can and about 4 feet or more for each end.

Tip: Use colored ribbon to match wedding theme colors. Tie the end pieces of the ribbon to an item to place in trunk/ hatch of vehicle. Make a gift box, using recyclable cartons.
craft skill level: 3 out of 5

Wednesday, May 26, 2010

Granola Bar Box Napkin Holder


Supplies:
recyclable granola bar box
recyclable decorative cardboard
paper napkins

Tools:
scissors
glue gun and glue sticks

1) Flatten a granola bar box by opening up glued down seams.

2) Cut off top end flaps.

3)
Draw a half circle on top of one face side. Cut along line. Save piece.

4) Take decorative cardboard piece and cut to fit front face side of granola bar box. Trace saved cut out half circle at top of decorative piece. Cut out along line. Discard both half circle pieces.

5) Glue sides and bottom flaps of box at previously glued down seams. Glue decorative cardboard piece to front face of box.

6) Put napkins inside.

Tip: Add embellishments for a personal touch. Use box to hold other items.
craft skill level: 1 out of 5